Learn how to create new tickets from the ServiceDesk tab in the ServiceTonic tool
Once defined the service in ServiceTonic it is time to start creating new Tickets. There are three different ways to do this:
- Agent Portal
- User Portal
Agent Portal
Accessing from a web browser as an agent, you have the possibility to create new tickets from the ServiceDesk tab. Here you can see the Create Ticket button which will lead you to the creation form. In this way, for example, if the agent gets a telephone call it can be registered in the Ticket in ServiceTonic.
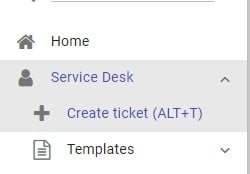
Click on the button to display the ticket maintenance form where to enter the incident/request data.
Introduce in the header of the Ticket a Title (brief summary of the ticket), choose the Priority (there will appear a default one) and the State of the Ticket (there is a list of configured states, among which the Petition state will be only for tickets created by the user).
In the lower tabs, in History, enter the Description of the ticket you are creating, you can indicate whether it is a public or internal description, if the text is part of the final solution and even indicate the time spent to solve the ticket.
In the tab Appropriations, mark the work team (the default is ServiceDesk) and the agents who are part of it will be shown. Select an agent to assign the ticket to, or just check the team without specifying a particular agent.
In the Contact tab, indicate the user affected by the ticket. You can do this in two ways:
- Searching for the contact in the Contact List. If it was previously stored (or if you consult the contacts of an LDAP) you can retrieve all the data by simply entering your primary key, by default it is the email, or your first name / surname and pressing the Enter key or the Search button. If you find it, ServiceTonic will retrieve all your data automatically.
- Entering the data manually. If the contact does not exist in the Contact List you can fill all your data in the same ticket and click on the Save button. The next time you want to associate the same contact with another ticket you can already find it in the contact list and retrieve all your data easily.

After completing this data, you could press the “OK Save” button to create the ticket and return to the ServiceDesk screen.
User Portal
The creation of Tickets from the User Portal is much simpler, designed in this way so that it is comfortable and intuitive for the end user. Once the user has accessed the Portal *, you can create a new ticket by clicking on the Create Ticket icon that appears on the home screen or by going directly to the New Ticket tab.

In a default service, the user will only enter the Title and Description of the ticket and optionally add any attached file or report with a copy to the people they want on the ticket activity. If desired, other custom fields can be displayed in the Portal so that the user can Categorize the ticket before it is received by the agents.

* Activating the User Portal previously from the application itself in Administration-> Service-> User Portal section and provided that the user has been given web access from his own listing in the Contact List.
You can also create tickets by mail if you have set up the mailbox service.
This way you will just need to send an email to the mailbox integrated in ServiceTonic, indicating the subject, which will be the Title of the new ticket, and typing in the message body the Description of the Ticket.
If you wish, you can also add attachments, which will be linked to the new ticket in ServiceTonic and can be used by the agents who take care of it.