
Adapt the User Portal to your corporate image and improve the branding of your company
In ServiceTonic we make our software adapt to the client and not the other way around. One of the most recent improvements is the possibility of adapting the User Portal to your corporate image.
What can i change?
- Top banner or welcome message.
- Colors (lines, text, background of the slogan and messages of the application).
- Logo.
- Side Banners.
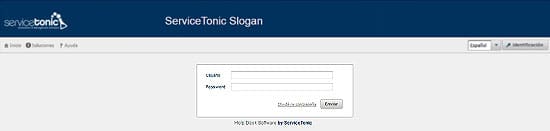
Banner or welcome message?
When the corporate image becomes paramount, it is best to create a banner for our User Portal. The banner allows us to place an image adapted to our needs.
Banner (Image)

Welcome Message (Text)

How do I do it?
Access to Administration→ Service → User Portal
Top Banner:
We must write in the Slogan an HTML code that allows us to visualize a visible image from the Internet.
The image (banner) to use must have a size of 950px x 80px:
![]()

The HTML code could be like the following: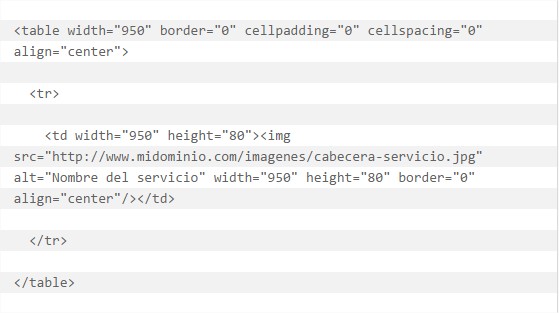
Where:
http://www.midominio.com/imagenes/cabecera-servicio.jpg It is the route where we will have the image visible from the Internet.
Welcome Message:
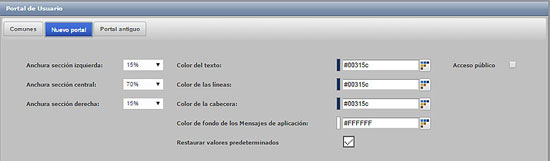
In the tab and modify the colors of the text, lines, header and messages of the application:[highlight color = “orange”] Common [/ highlight] you can configure the Portal Slogan including the HTML code you need to give it the most suitable format.
For example, to obtain

You must write:<table width="100%">
<tr>
<td align="center">
<table>
<tr>
<td valign="center" align="right"><font-size="6" color="#ffffff"><strong>ServiceTonic Slogan</strong></font></td>
</tr>
</table>
</td>
</tr>
</table>
You can write the slogan without the need for HTML code and you will get the default text format:

Colors
Access the tab [highlight colour=”orange”]New Portal[/highlight]
Logo
Access the Common tab and upload your corporate logo:
![]()
![]()
*The logo must have a size of 200 x 50px
Side Banners
You can create side banners to include relevant information for your users. For example, you can add a custom image that can be clicked on to open a new website
You need:
- Create HTML link with the image
- Create an HTML type ingredient
For the HTML link go to the Portal configuration, Links tab and add a new one:
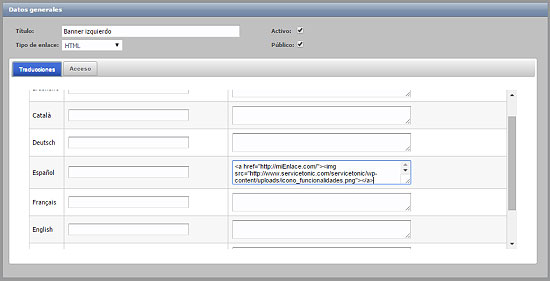
The code to use could be like the following:<a href="https://www.servicetonic.com/"><img src="https://www.servicetonic.es/wp-content/uploads/images/bannerIzquierdo.png" width="100%" border="0" align="center"></a>
Where:
- https://www.servicetonic.com/ will be the address that will be opened when clicking on the image
- https://www.servicetonic.com/images/bannerIzquierdo.png it will be the route of the image visible from the Internet.
*The image must be 350px wide so you want to stop, or use the function width = “100%”.
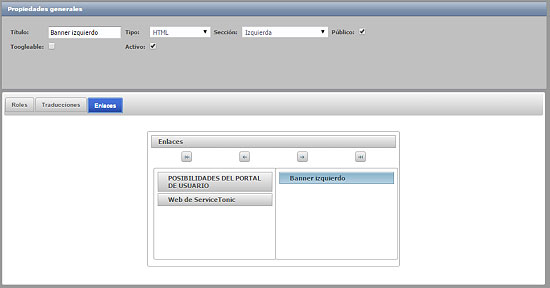
Then create a new HTML-type ingredient from the Ingredients tab of the User Portal and add the previously created link:
The indicated resolutions of the images have been optimized for screen resolutions of 1024px and above.

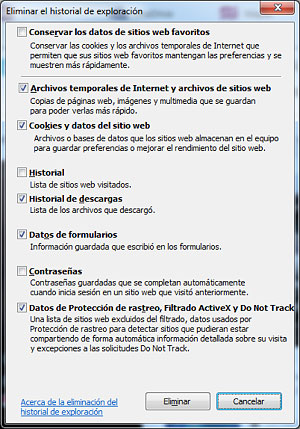
NOTE: When you test your browser, it will save the styles and images, so that when you make changes you may not see them unless you clean the browser’s cache.
You can press CTRL + SHIFT + DELETE on any browser to open the options for clearing cache: